I love these little crayon rolls!
What you will need:
2-5"x16.5" pieces of fabric. 1 for the outside, 1 for the inside. I used the same fabric print for both
1-6"x16.5" piece of fabric for the inside where the crayons will go.
20 inches of ribbon
crayons ;)
Step One
Take one of the 5x16.5 inch pieces that you will use on the inside of the crayon roll and lay it on a flat surface. Take the one 6x16.5 inch inside piece and fold it in half length wise. Press with hot iron and place on top of the back piece.
(yes that is a turtle, its where I keep my pins!)
Step Two
Pin into place along the sides.
Step Three
Now your going to pin your marks where you will make the lines for each crayon space.
Starting at the either end, measure 1 1/4 in and pin. Then pin every 1 inch after that. This will leave you with 16 spaces for crayons.

Step Four
Sew straight lines from top to bottom where each pin is marked. I like to go one stitch past the folded fabric onto the back fabric to make it more secure. I also suggest back stitching the same amount of stitches for a clean look. I back stitched 3 stitches on each line.
Half way done! =)
Step Five
Take your 20 inches of ribbon and place it in place on either end, right near the folded inside piece.
Step Six
Take your outer fabric and place on top. Make sure the right sides of the fabric are facing each other. Pin together. Make sure you pin the ribbon as well. And be careful when sewing not to sew the other ends of the ribbon into your seams.
Step Seven
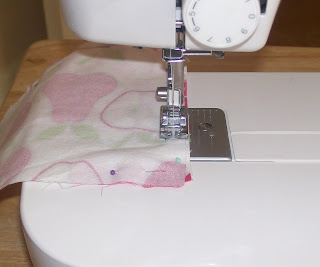
Sew the pieces together using a 1/4 inch seam allowance. Be sure to leave an opening of about 3-4 inches so you can turn your roll right side out. I like to start on the end opposite of where the ribbon is pinned.
I use the edge of my sewing foot as a straight guide for the 1/4 inch seam allowance.
Step Eight
Turn your crayon roll right side out. Make sure all the corners are out and press with hot iron.
Step Nine
Tuck in the fabric where the small opening is.
Top stitch to close the small opening and for a clean, finished look.
On the short ends I used a small seam allowance so that I did not take away space for the crayon. But on the top and bottom I used a 1/4 inch seam allowance.
Step Ten
Fill with crayons and enjoy!! =)
Please note that I do not speak the "sewing language". =) I am more of a visual learner, so I took tons of pictures. My apologies if some of my wording might not make sense. ;) Feel free to leave a comment with any questions.
Thank you!
Ps. If you click any of the pictures they will open up bigger for a better view of the details.


0 comments:
Post a Comment